The Art of Slumping Bottles
- 13
- Jun
© 2011 Nancy E. Burke (updated 2015)
Note: this article was originally written for GLASScraftsman in 2011, but the magazine folded just before publication. I retained all rights to articles written for GLASScraftsman.
The Art of Slumping Bottles
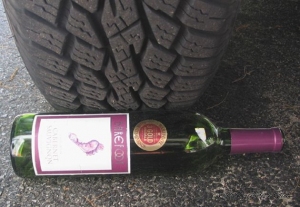
My cheeseboard display for local craft shows has a picture of a Jeep tire ready to smash a wine bottle. Underneath, it reads, “How to get a Flat! You and I know that this was really done in a kiln, but wouldn’t it be fun to joke about it with your friends?”
It is a great conversation starter, especially after people touch the cheeseboards to see if they are plastic. “You mean these are actual bottles, flattened?” “How do you press them down in all that heat?” I explain the firing process, and many say, “Isn’t this cool!” I sometimes quip, “1400 degrees isn’t cool, but the results really are!” This is all in the life of slumping bottles.
I’ve been flattening and selling recycled bottle cheeseboards since 2004, and found a market for them more recently powered by the “recycle, reuse” movement. I quickly found that cheeseboards, made from free bottles collected from my local recycling center and from friends, were extremely profitable when compared with my work made from art glass. The effort became a pillar for my business and paid for kilns, sandblasting equipment, and saws (and various Cool Tools).
This article will help you with the process of slumping bottles into cheeseboards,
tableware, and other uses. Bottles have been recycled by artisans for generations. I recall seeing heavy green drinking glasses made from bottles in the 1970’s. Sadly, few bottles are suitable for this reuse anymore, as industry has moved towards much thinner bottles to cut shipping costs. Thin bottles affect results at the kiln, so you must pay attention to this, too.
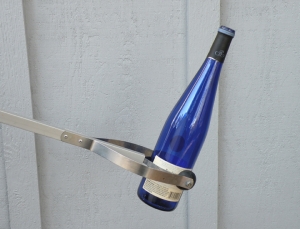
Acquiring bottles to slump can be a challenge. My booth visitors often ask if I drank all of that alcohol before I flattened the bottles. No, but I have been fortunate that my local recycling center allows me to “pick” from the dumpsters as long as I’m not holding up traffic. Other people have friends working at bars and restaurants. Getting bottles out of dumpsters isn’t hard; I use a “reacher” either four or six feet long. (Just watch out for people lobbing bottles over your head while you are retrieving!
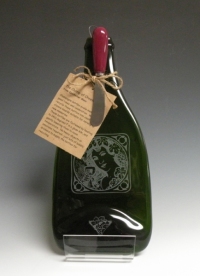
Bottles have either flat or punted bottoms. The word “punt” evolved from “pontil”, relating to how glass blowers made bottles. Punted bottles, with their indented bottoms, are stronger, and are almost always used for sparkling wines and many fine wines. Flat bottoms fold up when bottles are fired on their sides. Punted bottoms with a large indentation fold in, leaving a nicely finished appearance. The finished sand-etched champagne bottle cheeseboard below is a prime example.
When selecting bottles, always pick a heavy one over a light one. Light bottles get a bubbly finish, and show seams where the bottle was molded. Heavy ones have a smoother finish after firing. For beer bottles, I get the best results with European bottles, such as Erdinger.
Bottles have their own terminologies. A bordeaux wine bottle has well defined “shoulders”. These always create a bubble below the neck of the bottle when flattened, a place to rest a knife. The burgundy bottles and hock bottles have sloped shoulders, and create little or no bubble at that location.
The best labels are printed with high fire enamels directly onto the bottle. Examples are Grey Goose, Corona, and Rolling Rock bottles. Some Rieslings have “framed” pictures of scenes that look 3D when fired. These require special treatment. First, you need to sandblast off the Product Code and text on the back. Then, you need to prop the bottle up with bits of fiber paper to keep it face side up during firing. If you have a bottle, but are not sure if the paint will survive firing, the only way to know is to fire it. The Bombay Sapphire bottles are a beautiful light blue, but most can be fired, including the nips (I’ve encountered a few 750ml bottles that are painted).
Most labels are glued on with water soluble or sticky glue. It used to be that water soluble glue was used. More and more, I am seeing the sticky variety, and it is much harder to remove. If you soak a bottle with water soluble glue in hot water, the label will loosen in just a few minutes. You can often retrieve these intact. The sticky labels usually loosen somewhat when the label is heated with a hair dryer or by filling the bottle with hot water. If you are lucky, they will peel off, leaving little residue, or be teased off with a razor blade. More often, there is residue to be scraped off with a razor blade. Scrape under cold water, so it does not smear across the bottle. Once you remove as much as possible, you need a solvent. Goo Gone Gel or 91% rubbing alcohol is the most useful, or acetone if you clean them outdoors, but you need to wash the bottle very carefully in dish soap afterwards to make sure the agent is removed (and do it again to be sure!). Sometimes 91% rubbing alcohol works instead. You can usually tell the kind of label by sticking a fingernail under a corner. The glue labels are crisp and the sticky ones are like trying to peel tape.
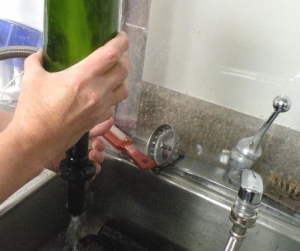
Bottles don’t usually need much cleaning on the inside. Usually the label soak is enough to loosen any dirt. If there is some left, use a bottle brush or even a bottle washer (see below) to finish the job.
When you have a clean bottle, you need to know which side is up. I place a clean and dry (they don’t have to be dry on the inside) bottle on a level counter and mark the top of the lip with a black marker so I know how to place the bottle in the kiln. Otherwise, the bottle will roll.
Next you need to apply a food safe flux or they will devitrify. Most competitors I see at shows have scummy looking bottles, and that is why. There is an inexpensive and nontoxic Borax solution you can make with 20 Mule Team Borax. I had some streaking problems, so I experimented on this with fellow guild member Penny Faich, and I settled on the following:
- Dissolve 2TB of Borax in 2 cups of warm distilled water. After it dissolves and cools, decant the clear solution into a larger container, discarding any undissolved Borax.
- Add 2TB of Boraxo (soap flakes) into the clear solution. Mix gently every 20-30 minutes so that the flakes are hydrated into the solution over a period of two hours. If you don’t, you will get a semi-solid scum on top you will need to remove. After several hours, or even overnight, put the mixture through a kitchen strainer into another container. The mixture should seem like a thin gelatin. If it has white blobs, strain it through a finer mesh. The speed of hydration is temperature dependent.
- Put the finished gel solution into a lidded container. Add several drops of a surfactant: dish detergent or PhotoFlo 200 (used in darkrooms) per 2 cups of solution. I maintain a 2 gallon container by adding more solution when the levels drop. I usually dip my bottles into it, and use a sponge brush to bring solution up around the top of the bottle. The main rule is to avoid bubbles—they interrupt flow of the solution on the surfaces. Otherwise, it lasts indefinitely.
I place the dipped bottles on a plate rack I got from Ikea. When bottles are dry, I add a loop of high temperature wire to the top, and put the bottle on its back, with the top mark up.
Kiln placement of the bottles is a matter of experience. In a 24”x24” JK2 kiln, I typically do six wine or champagne bottles. Any more, and I risk some sticking together. In my 15” Jen-Ken, I do one wine, champagne, SKYY vodka bottle, or three beer bottles. When you place them into the kiln, make sure the mark you made on the bottle is facing up and that your kiln shelf is also level.
An example schedule for medium weight wine bottles that works with either kiln is (temperatures are in Fahrenheit):
450/hr. to 1100 , hold 10 min.
AFAP to 1405, hold 2 min.
AFAP to 1030, hold 30 min.
100/hr to 700, cool to room temperature
Add temperature and time for champagne bottles. Slow the initial ramp to about 200-250/hr. for bottles with thick bottoms (like Grey Goose and magnum champagne bottles), and also extend the anneal hold for those thick bottomed bottles well beyond the 30 minutes used for “normal” ones. I also do “nip” bottles (for ornaments) in a third, smaller kiln. Use slower up-ramps and higher temperatures for those. Remember that kilns vary in heating and cooling characteristics, so you need to tune the schedules to your equipment. It just happens that my small kiln is a good test kiln for the larger one.
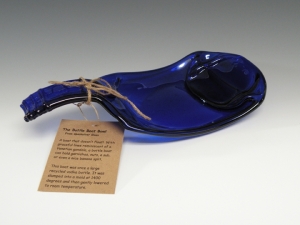
For slumping into molds, I use the same schedule for the “bottle boat” mold that is widely available, except I do it at 1400. Sometimes I need to coldwork the edges afterwards, but I want to make sure the borax flux matures instead of reducing the slump temperature. I also fire SKYY magnums in a bowl mold, but ramping at 300/hr., and taking it to 1410 Spoon rests can be made with smaller bottles on stainless steel or sandblasted porcelain spoon rests.
So now that you’ve fired them, you need to prepare them for market. I put five plastic “feet” or bumpons on the bottom of the cheeseboard, and tie a stainless steel spreader knife with hemp on the neck. I’ve written hang tags printed on recycled brown paper for each type of bottle. Those who don’t use knives often place a fancy bow around the neck.
What do I do when I have devit, bubbles, or a molding line down the middle? In most cases, I sandblast a design onto them. With really bad devit, I sandblast and refire the piece at 200/hr. My most popular cheeseboards are not perfect firings! Perfect ones, I leave perfect (unless somebody hires me to customize it). I have a bin with the best champagne firings for such jobs unless someone wants a specific bottle done.
Others find many ways to decorate cheeseboards, depending upon whether they will be used for food. Some wire wrap decorations onto the board or the knife or glue things on—glass and otherwise (cold fusion). Others paint onto the board itself. I will insert die cut copper shapes into clear or lightly colored bottles before firing. Others throw in a little frit.
What else can you do with bottles? You can make wind chimes out of small flattened bottles, or bottles that have been cut You can cut rings with a tile saw and fire them and use macramé to connect the rings. While thinking of new projects, don’t forget the cardinal rule of glass compatibility. If you don’t know the glass, it is only compatible with itself! Two seemingly like bottles (say, Corona bottles) may have different glass.
Where do you sell the bottle art? I’ve found co-ops, gift shops, liquor stores, and local craft shows to be the best bets. Cheeseboards are “gifty” and are popular for housewarming, wedding, hostess, and holiday gifts. They sell best at two kinds of shows: Indoor shows during the holiday season when people (mainly women) buy gifts, and outdoor shows, where there are more men who buy a large, fancy bottle to hang over their bar. Cheeseboards don’t mix well with higher end glass art in a booth display. People will gravitate towards the cheeseboards and ignore the art! And if you don’t sell them, yes, didn’t I say that cheeseboards make great gifts?


Nice information told in a friendly and informative way.